What are the three main parts of a telescope?
The ability to turn the naked eye toward the night sky and resolve distant celestial wonders is one of humanity's oldest desires, and the telescope is the supreme instrument for fulfilling that quest. At its most fundamental, a telescope is a light bucket, designed not necessarily to "magnify" as much as to collect and concentrate far more light than the human eye can gather alone. This concentrated light carries the image of a distant star, planet, or nebula, which is then presented to the observer. While many intricate accessories exist—filters, star diagonals, tracking motors—the entire complex system boils down to three main, non-negotiable components that must work in harmony: the Optical Tube Assembly (OTA), the Mount, and the Eyepiece System. Each component is crucial; a flaw in one can render the finest component of the others useless.
# Optical Tube
The Optical Tube Assembly, often simply called the OTA, is what most people visualize when they think of a telescope. It is the hollow structure, typically made of metal, plastic, or wood, whose primary job is to house the main light-gathering element and maintain a precise, fixed distance between the various optical components. This component is the heart of the instrument because it determines the two most critical performance specifications: aperture and focal length.
# Light Collection
The defining characteristic of any telescope's optical performance is its aperture. This is simply the diameter of the main light-gathering element—the objective lens in a refracting telescope or the primary mirror in a reflecting telescope. The larger the aperture, the more photons the instrument can sweep up from faint, distant objects. This ability to collect light is what allows astronomers to see dim galaxies or subtle details on far-off planets. A 102-millimeter aperture telescope, for instance, is often referred to as a 4-inch telescope, demonstrating the common use of inches alongside the standard millimeter measurement.
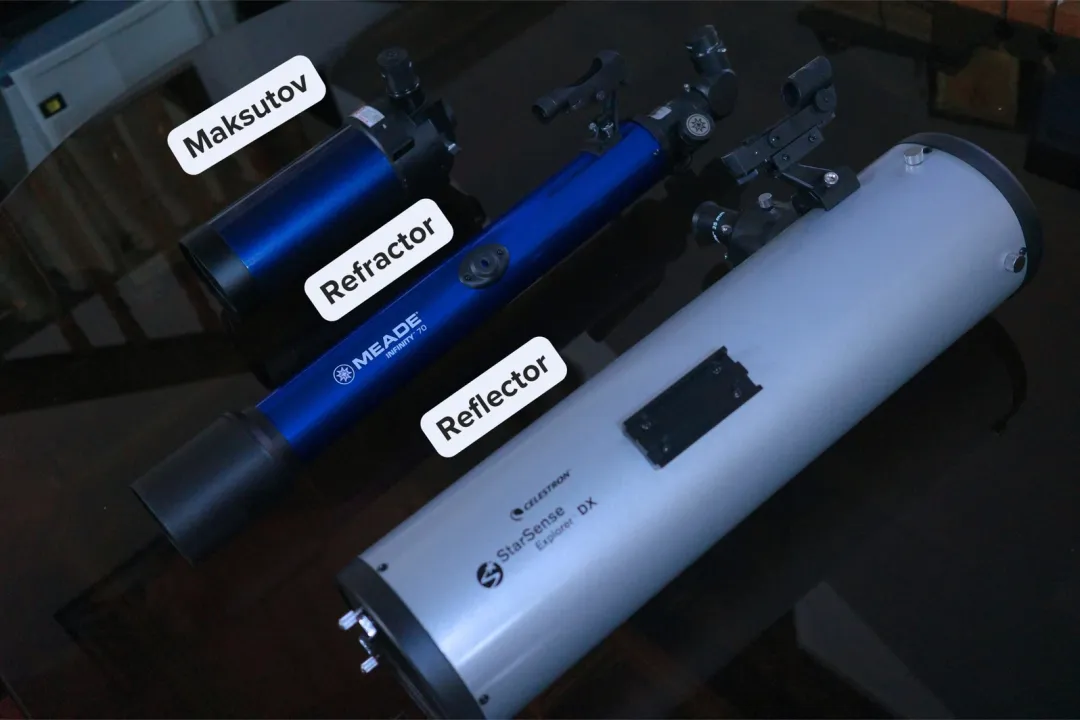
The material and design choice for this primary element divide telescopes into distinct types. Refracting telescopes rely on a large lens at the front of the tube to bend, or refract, the light inward. While excellent for producing crisp, high-contrast views of planets and the Moon when well-made, large lenses are extremely heavy, difficult to manufacture perfectly smooth, and suffer from chromatic aberration—where different colors of light bend at slightly different angles, causing fuzzy, rainbow-colored fringes around bright objects. Making a very large, high-quality objective lens is technologically challenging and expensive.
In contrast, reflecting telescopes use a curved mirror, usually at the back end of the tube, to gather and bounce the light to a focus point. Because the light only has to travel across a single reflective surface rather than through thick glass, mirrors are significantly lighter than lenses of comparable aperture size. This makes reflectors easier to build in large sizes and eliminates chromatic aberration, as all wavelengths of light reflect uniformly. While the primary mirror in a basic reflector flips the image upside down, secondary mirrors are used to correct this orientation for astronomical viewing, where "up" and "down" are meaningless anyway.
A third category, compound or catadioptric telescopes, such as the popular Schmidt-Cassegrain (SCT) or Maksutov-Cassegrain (MCT), incorporate both lenses and mirrors. These designs are ingenious as they "fold" the light path, allowing very long focal lengths to be contained within a short physical tube, offering a great balance of portability and power.
# Measuring Optical Path
Beyond the physical aperture, the focal length is the second key specification derived from the OTA's primary optic. This is the distance the light travels within the tube system to converge at the focal point. Focal length is typically measured in millimeters. A telescope's personality is often defined by the relationship between these two metrics, expressed as the focal ratio (or F-number), calculated by dividing the focal length by the aperture diameter.
This ratio gives an indication of the physical size and speed of the optical path. Generally, an F/10 scope is considered "slower" and longer, often prized for sharp planetary views because it is inherently easier to manufacture with fewer optical distortions, while an F/5 scope is "faster" and shorter, offering a wider field of view but potentially introducing more optical aberrations that become noticeable at higher magnifications.
It is important to internalize that the aperture—the diameter of the primary mirror or lens—is fixed for any given telescope. You cannot physically increase the light-gathering power of a telescope after purchase. While you can certainly swap eyepieces to change the magnification, the amount of light the telescope can collect is permanently capped by that initial measurement.
When considering a first instrument, especially for planetary observation, a common mistake is to focus too heavily on magnification. If a telescope has a small aperture, pushing the magnification too high only results in seeing a larger, dimmer, and fuzzier version of the target. For instance, a good rule of thumb mentioned by experienced observers is that the maximum useable magnification is generally twice the aperture in millimeters (e.g., a 100mm scope maxing out around 200x). If your local atmospheric conditions, or "seeing," are turbulent, even this theoretical maximum might be unusable, suggesting that investing in a larger aperture, even at a lower initial magnification potential, yields clearer results over time than chasing high power with a small objective.
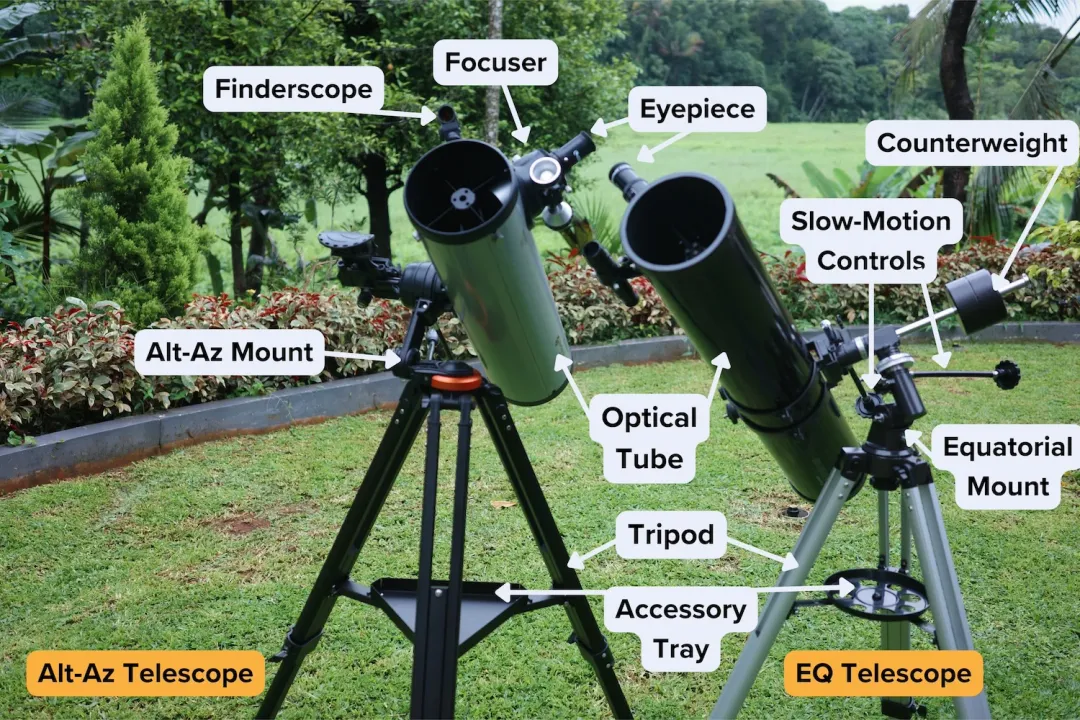
# The Mount
The Optical Tube Assembly, no matter how perfectly figured its optics are, is useless if it cannot be held still and aimed precisely. This is the job of The Mount. The mount is arguably the unsung hero of the system; poor optics on a steady mount can still provide an enjoyable, focused view, but excellent optics mounted on a shaky, inadequate support will lead only to frustration, as the slightest breeze or focus adjustment will cause the image to vibrate.
The mount's function is twofold: to support the weight of the OTA and to allow controlled, incremental movement across the sky to compensate for the Earth's rotation, ensuring a target remains centered. Mounts fall primarily into two intuitive, easy-to-understand categories: Altitude-Azimuth (Alt-Az) and Equatorial (EQ).
# Altitude-Azimuth Mounts
The Alt-Az mount operates exactly like a standard camera tripod, offering motion along two perpendicular axes: up/down (altitude) and left/right (azimuth). This design is intuitive for anyone who has ever used a tripod. A very popular variant of this design is the Dobsonian mount, which is essentially a highly stable, turntable-like base that rests on the floor or a table. Dobsonians are renowned for offering incredible stability and aperture for their cost, making them a favorite for deep-sky visual observing.
# Equatorial Mounts
The Equatorial mount is the more specialized design, often associated with serious tracking and astrophotography. Developed historically in Germany, it is sometimes called the German Equatorial Mount (GEM). This mount requires a process called polar alignment, where one axis must be aligned precisely with the Earth's rotational axis, often by pointing it toward Polaris, the North Star. Once aligned, the EQ mount only requires movement along a single axis (Right Ascension) to track a celestial object as it moves across the sky, making it ideal for long-exposure photography or precise study. These mounts often feature graduated circular scales based on the celestial coordinate system of Right Ascension and Declination to help locate specific targets.
# Control Systems
Regardless of whether the mount is Alt-Az or EQ, it can be offered with varying levels of automation. The simplest is Manual, where the observer does all the pointing and tracking. Stepping up are PushTo systems, where a sensor-equipped computer guides the user where to manually move the scope to find a target, though tracking still requires manual effort. The highest level of automation is GoTo, which features internal motors controlled via a handset or smartphone app. After a setup alignment (sometimes aided by built-in GPS), a GoTo mount can automatically slew to and track a selected object by making continuous motor adjustments.
While computerized GoTo systems offer convenience, the actual quality of the mount structure itself—the sturdiness of the tripod legs, the precision of the bearings, and the lack of "play" in the joints—is more important than its level of computerization. A well-built, sturdy manual Alt-Az mount will provide a far superior, steady visual experience than a cheap, wobbly EQ mount struggling to hold the same optical tube, regardless of whether the cheap one claims to have motors.
# Eyepiece Assembly
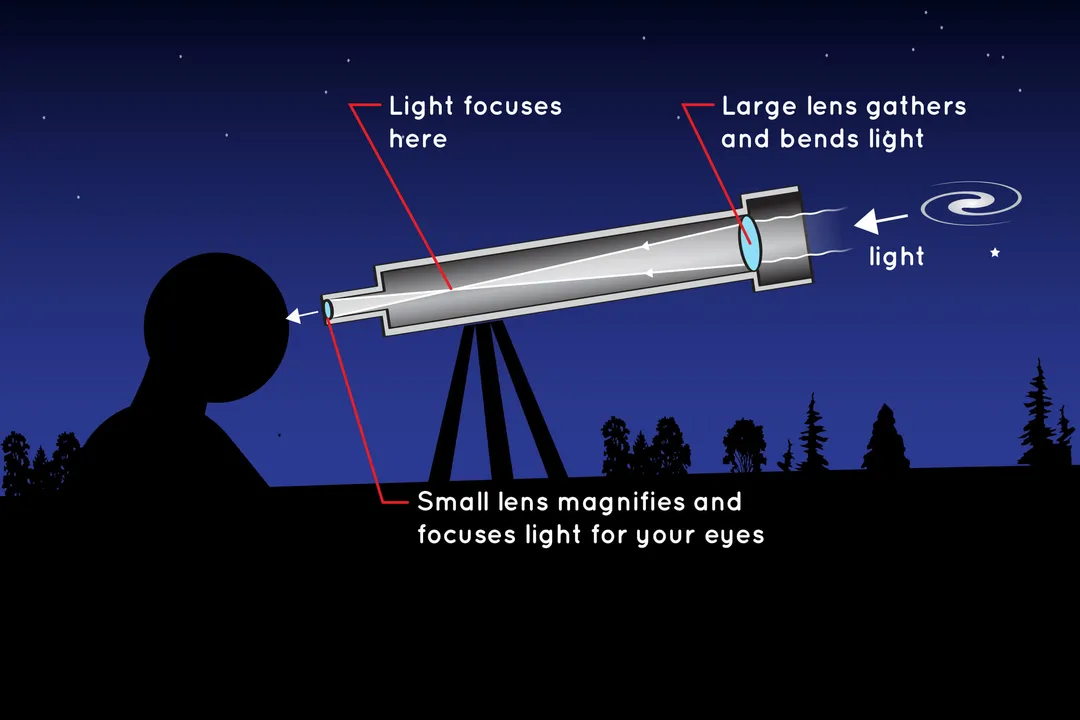
The third fundamental part of the telescope system is the Eyepiece and its immediate interface with the OTA—the focuser. The OTA collects the light and forms a sharp image inside the tube; the eyepiece's job is to take that focused image and magnify it for the observer's eye. A telescope package usually includes a few eyepieces, each providing a different level of magnification.
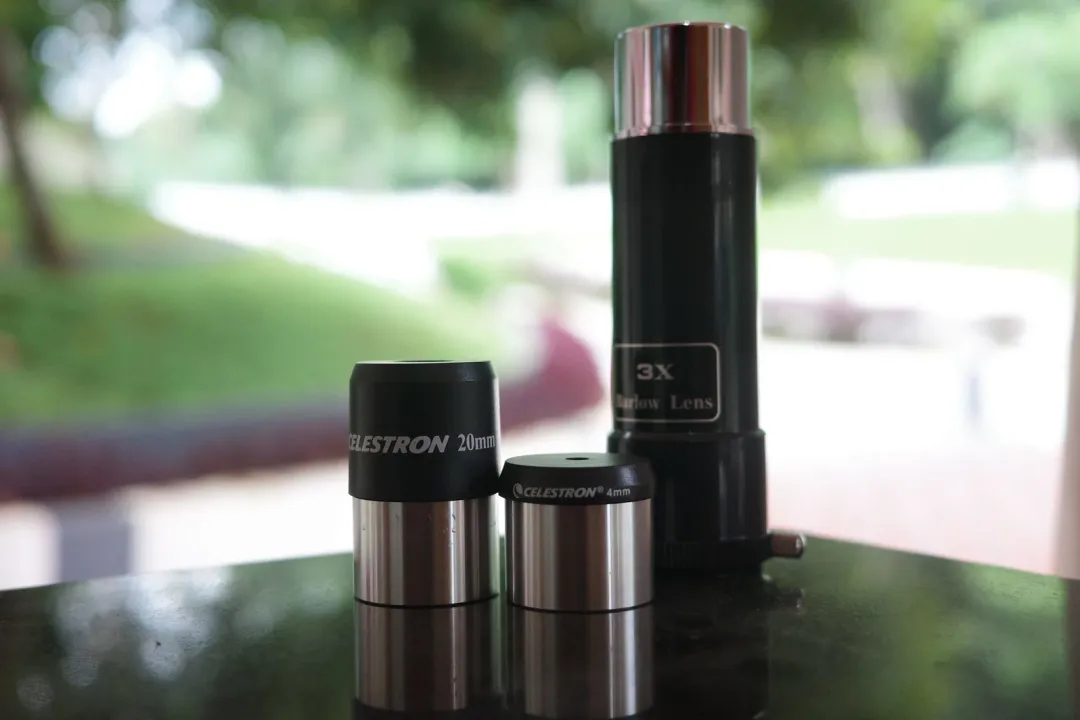
# Magnification Control
Magnification is a simple ratio derived from the two key optical components: the telescope’s focal length and the eyepiece’s focal length:
This calculation demonstrates a key principle: eyepieces with a shorter focal length (e.g., ) produce higher magnification than those with a longer focal length (e.g., ). This modularity is a major advantage; since eyepieces are largely standardized, users can purchase new ones from different manufacturers to swap between telescopes or increase their magnification options.
To further extend the range of view without buying many individual eyepieces, a Barlow lens can be introduced. This accessory fits between the focuser and the eyepiece, effectively multiplying the eyepiece’s magnification by a set factor, commonly or . For example, a eyepiece used with a Barlow acts like a eyepiece, doubling the power.
# Focusing and Viewing Convenience
Before the light reaches the eyepiece, it passes through the focuser. This is a mechanism, usually incorporating a dial or knob, that moves a small internal tube in or out to achieve the sharpest possible image. Beginner models often feature a simple single-speed focuser, while more advanced units may offer a dual-speed adjustment, which allows for a quick coarse adjustment followed by a very fine, slow adjustment for perfect pinpoint focus, especially critical at high magnifications.
For convenience, especially with refractors or compound scopes where the eyepiece ends up pointing nearly parallel to the ground when aimed high, an accessory called a diagonal is often employed. The diagonal slots into the focuser and contains a prism or mirror to bend the light path by $90$ degrees, allowing the observer to look down into the scope rather than having to crane their neck upward. For pure astronomy work, a $90$-degree star diagonal is optimized, though $45$-degree diagonals exist primarily for terrestrial daytime viewing, as they present an image that is correctly oriented horizontally (though still inverted vertically). It is worth noting that Newtonian reflectors do not typically require a diagonal because the secondary mirror already directs the light path toward the side of the tube near the focuser.
The quality of the focus mechanism directly impacts usability. A smooth, backlash-free focuser, such as a Crayford style, allows the user to dial in critical focus without the image jumping or losing its position, which is vital when viewing delicate planetary details or attempting astrophotography.
In summation, the telescope system functions through the strict cooperation of these three elements: the Optical Tube sets the potential based on light-gathering power (aperture) and focal length; The Mount provides the indispensable stable platform for aiming and tracking the sky; and the Eyepiece Assembly translates that concentrated light into a viewable, magnified image, with its quality determining the final comfort and clarity experienced by the observer.
#Citations
Parts of a Telescope for Visual Observation & Their Functions
Telescope: Principle, Different Parts, and Advantages - Turito
Can some explain what the different parts of a telescope do - Reddit
How Do Telescopes Work? - NASA Space Place
Lesson 2 - PRI301: Applied Studies - Weebly
The components in a telescope - Astroshop.eu